Wednesday, March 23, 2011

Boar's Head Torque


Greetings Celts,
It has been awhile since last I blogged, although there was no Celtic Fest in 2010, I was still up to my ears in work. In time for this year's Celtic Fest I was at last able to get the work on a torque done. This has not yet been put onto my website, but that will be the next step. The torque measures 5.5" or 14cm across and 7" or 18cm top to the opening. It is made from brass and can be adjusted by shaping it to your own size. I shall be offering a choice of the plain torque or you can have it gold plated to avoid tarnishing. The boar's head has ruby red crystal eyes but no tusks, I intend to offer them with bone, ivory or mastadon ivory tusks. Although they are quite small, it is very time consuming to make them. Anyone wishing to make their own is welcome to do so. I can willingly supply the material for you to do your own.

Sunday, March 29, 2009

Back in the Grove 4

Hello once more, today I intend to do the last in this series on the "Celtic Cuff".

The adjacent picture shows the stippling that highlights the knot work as is the case with the lettering in the Book of Kells, the Lindisfarne and MacRegol Gospels. It is also seen on the lettering around the edge of the Ardagh Chalice in the National Museum of Ireland, Dublin. Although very time consuming it does make the knotwork stand out.

In the last picture you can see how the knot work has been planned to go around the hinge at the bottom of the cuff and continues all the way around. The design is a constant reminder that ones Path through Life consists of ups and down and eventually end up at the beginning and starts all over again. Finally the catch that you see in the upper part of the picture, has a built in safety catch. It is a double click catch that opens up by pressing the little bar.


This is the last of the pictures and it shows the open cuff as well as the catch with the CE mark on the bottom. I trust that this was of interest to some of you, and thank you for you time.
Now I need to get going on my new venture at the Granville Island Market, in Vancouver. My opening date will be April 11th over the weekend. TTYAL (talk to you all later) RD

Friday, March 27, 2009

Back in the Grove 3


Phew, a busy cople of days. Anyway let me get back to the Celtic Cuff. You'll have to forgive me for using "Roman" numerals. God knows what I was thinking about.


Steps # 3 & 4.Next you see the development
of the design and a moments distraction
causes a minor mistake, corrected with a
little white-out.

The design is transferred to the bracelet/cuff and you can
just see the faint lines scribed before the engraving starts.
The little yellow pointer show where I have cut and the burr stands up before the intersecting line removes it. The burrs
are a little more visible in the next picture and the that look
like shadows make it easier to see them.

Well as Bugs Bunny said " That's All Folks"
Check in again and see the end of the Celtic Cuff. Soon to be featured on my website www.celticempire.com


Wednesday, March 25, 2009

Back in the Groove II


Top O'the mornin to You.


Where did I leave off?


The next step in the bracelet/cuff. . All Celtic art starts in the head and materializes via paper patterns on a multitude of objects. Personally I try to find a functional purpose for all things to which I apply Celtic art. So the first step is to make a copy of the area to which I am to engrave my design. The first image here is a section of the 205x 10mm strip along with the tools involved.


The next step is to divide the strip into a grid and then the dots in each of the quadrants and a basket pattern is laid out in pencil before being done in ink. Here you can see the cuff opened with the catch that has the trademark on it. In the next picture you can see how it looks closed and a ruler and a new copper cent gives you an idea of the size. The measurements are 51x 60mm oval and 3mm thick, yet only weights 23 grams since it is hollow.
While you are doing that, I'll get ready with the next step.
Have a great Day.
RD

Tuesday, March 24, 2009

Back in the Grove


At the patient insistance of my "Blogging Mentor", I am trying again to convey some of the stuff I have been doing.

The sterling silver cuff that had me stumped, blogging, logging or posting, should now proceed a little more smoothly. This time I'm going to do it in wee bits and pieces.

I did start a lovely new cuff/bracelet. Unique in that like hand cuffs it opens and then closes around the wrist for a lovely smooth bracelet. I am about to describe what all is involved in the design as well as the engraving.
Please bear with me as we progress through the variouys stages of creating a unique Celtic Cuff.

Tuesday, November 25, 2008

MADE TO LAST.....................


For those who have seen my website http://www.celticempire.com/ , you may have seen under Celtic Leather, a card case that was purchased 27 years ago by "Robb" and was lost several times in some very remote places but always returned. Well this Christmas Robb decided that replicas or similar card cases would make nice gift for a number of associates and friends.

I should like to share with you the steps in making these "CC's". The leather pieces are cut in large numbers from 6oz calfskin. Once cut the edges are airbrushed in tightly packed bundles, then burnished before the thin line is added just for a finishing touch.

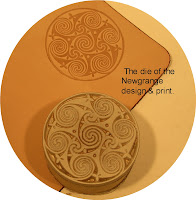
The next step is to emboss or rather impress a design onto the leather. In this case the "Newgrange" spirals, adapted from the burial mound on the banks of the river Boyne in Ireland, was the inspiration for this design. Today access is rather limited to this megalithic tomb, but in August 1984 people were allowed into the tomb with little or no restrictions. On the left is a picture of the design pressed into the leather beside the actual engraved block used in this instance.


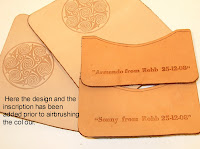
Next we have the inscription or lettering that 'Robb' wanted on the inside of the card cases for his friends. The lettering used is moveable type set in a "Halvorfold-Kwikprint" machine and is changed for each separate name. Needless to say the type has to be choosen to fit within the limited area of the inside pocket.


Next the front part of the card case are airbrushed in the desired colour.


Here you see burgundy or 'Cordovan' a name derived from the city in Spain called Cordoba, which was given to it by the Moors when they occupied Spain and brought their skills in leather craft with them.


Now the assembly of the parts are glued together and then sewn with matching colours of thread. Burgundy on top and natural on the bottom. In large 'Machination" versus 'Manufacturers' ( manu = hand, facture= make), these are fed into a machine and sewn a precise distance from the edge. No hands needed to guide the the pieces through the machine.


Once sewn the edges are buffed and the corners are put on individually. In many commercially produced leather items there are only corners on the front for appearance sake. I prefer to put corners on all sides so as to ensure that the item will last for a lifetime. For me it is very rewarding that someone like Robb came back after all these years to show me that although well worn, the function of the card case he bought so long ago was mantained.


Through the magic of the digital camera, I am able to post an image ( on the left) of one of the finished card cases that Robb is going to give to his friends and associates. I sincerely hope that many years hence they will also look back upon Christmas 2008 with fond memories and enjoy the function of this simple but most useful of leather articles.

Sunday, November 23, 2008

Evolution of "Mother and Child" Pendant.

The evolution of this design is a perfect example of serendipity. To follow the steps it begins with the selection of the stone. I choose from a number of 30x22mm ovals and once selected traced a proportional oval upon which to set the stone: using a template I choose a 60mm long axis to go with the 30mm long axis of the stone. It is then positioned at the lower end of the larger oval and I start to work out the design which Is then traced in ink before being transferred to the metal.


Now we have the design which is done in pencil until we have one that meets with our design criteria, and that will be rendered in ink. This in turn will be traced onto Mylar before being transferred to the silver blank.


The next step in the evolution is the cutting of the Sterling silver blank and making the bezel for the stone and it will immediately be noticed that there are stamps on the oval. Originally these were applied to prevent fraudulant manufacturers from selling metal that did not conform to the standard of 925/1000 part pure silver and 75/1000 copper, tin or lead in some instances . Here you see the ster mark as well as my registered trade mark RD, plus a further mark which I apply to indicate that it has been made in Canada .

On the right is the design traced onto the sterling silver blank with a tungsten-carbide scriber. Although this is very faint it is enough to guide the engraver. The process of transferring the design is a very simple one that I learned from an engraver who had learned his craft/trade in the large manufacturing firms of England, producing silverware for the wealthy clients who would commission whole tea services with their family crest engraved on each piece. These sets would consist of a simple "Tea Service" of a tea pot, milk, sugar, sugar tongs, strainer and tray. The process is to trace the design on the reverse side with a pointed stylus, not sharp, but enough to leave an indentation. You roll soft wax or plasticine over this and then align the work underneath and burnish with a bone or smooth piece of plastic so as to transfer all the wax to the work and leave a faint line that has no wax. This then is scribed onto the work.


Eh, voila we have the finished pendant in a lovely presentation box along with a photograph for insurance records as well as a card with the story of the evolution.
It started out as a simple Celtic knotwork to fit the shape of the stone and the blank, however once I started the engraving it became clear to me that this looked very much like a mother in times gone by who might squat at the riverside to give birth to her child. Arms out to catch and enfold, with knees projecting on either side. Not till later did it occur to me that even the shape of the piece and the position of the stone were also really indicative of the child bearing process. It is with humility and wonder that I think of my mother who went through this process which has brought me to this.